My way of structuring files for Data Science Project!
Hello,
I recently made a transition from the Azure + Databricks platform to GCP (Google Cloud). So far I am enjoying the capabilities that GCP offer to Data Scientists and Machine Learning Engineers. Vertex AI and the recent introduction of the Vertex AI workbench show the commitment from Google towards ML/AI practitioners.
Most of you must have come across ‘cookiecutter’, a project template for data science projects. It is a fantastic template format for ML projects, but it feels overwhelming for small DS projects. I tried to leverage the format for some of my initial DS projects, but could not use all the capabilities under it. I searched a lot to find the best fit for my projects, but there is no perfect way to do it. Finally, after researching and referring to multiple open source projects, I wireframed my own!
Data Science for Social Good has many projects and pipelines they follow. The typical workflow I also use as per the diagram. Excuse my handwriting here. I am learning to use XP-PEN.

1. Prototyping in Jupyter notebook:
I think most of us do it. Whenever we start working on any project, the first thing we do is to spin up the cluster, create a jupyter notebook, and start writing code. I put comments in markdown and working code in cells. The code is not necessarily optimized. Once I have a working prototype (data imports + EDA + Features + base model), I am good to go towards modularity. The sad part is that many keep their final code in the same format.
2. Functions with inputs as data and parameters:
Once the working prototype is ready, I look for the steps which can be converted into functions, e.g. I have steps as follow in my working code:
df['start_date'] = pd.to_datetime(df['start_date'])
df['end_date'] = pd.to_datetime(df['end_date'])
I would try to have a function as follow and apply it to the dataframe.
def str_to_datetime(x):
    return pd.to_datetime(x, format='%Y-%m-%d %H:%M:%S')
3. Test function in Jupyter notebook:
Once I have the function ready, the next step is to validate it in the same jupyter notebook. So instead of converting the string to date one by one, apply the function in a loop. We can also try Lamda to access the performance. If you are working in a team, make sure to prioritize the readability. We can ‘time’ the cell by:
%%time
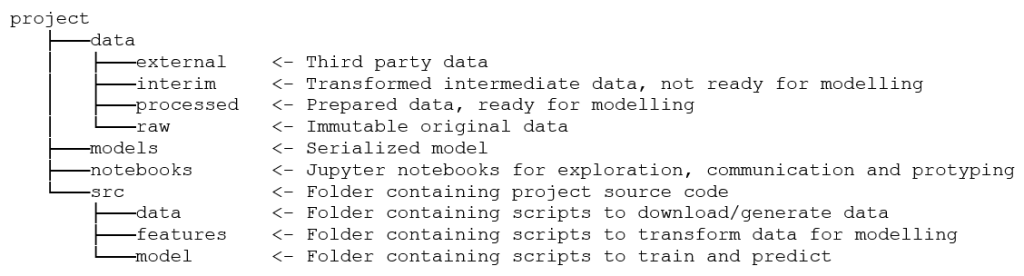
4. Move function in ‘src’ folder
The below folder structure is used for the reference purpose. We can have our customized folder structure. Once we have a function returning desired output in the Jupyter notebook, it’s time to move the code snippet to ‘src’ folder. If the function is a helper function, it can be moved under helper.py file. We can have the below scripts for dedicated pipelines:
- Data Import and Manipulation
- Feature Engineering
- EDA
- Model train
- Model test
- Helper Functions
Mostly these scripts are python files with .py extensions. One script can be imported into another as a module.
import helper_func as hf

df['x_new'] = hf.str_to_datetime(df['x'])
5. Import the function in Jupyter/.py notebook
Now we have dedicated scripts for different data science tasks as mentioned above. The first thing to pay attention while importing a function/class as a module in the main script is the path. Make sure the directory pointer is at the correct location. If we are importing a function/class from a Jupyter notebook to another Jupyter notebook and both the .ipynb files are in the same folder, the below snippet will work without any external package installed
%run helper_func.ipynb

df['x_new'] = str_to_datetime(df['x'])
The below code snippet should also run for a function import:
# Helpful if the helper.ipynb file has a lot of functions defined

%run helper_func.ipynb import str_to_datetime

df['x_new'] = str_to_datetime(df['x'])
If we have code snippets in .py file and want to import as a module in either .py or .ipynb file, the below snippet can be helpful:
import helper_func as hf

df['x_new'] = hf.str_to_datetime(df['x'])
6. Test the entire flow:
The final step of the development phase is to test end-to-end flow. Once we have model_train.py file ready (code moved from model_train.ipynb), test the code flow using the below command in the terminal. Make sure you are at the correct directory path.
python model_train.py
The next important thing is to set the MLOps pipeline!
Leave a comment