

AutoML on Vertex AI: A Guide to Custom Entity Extraction
Hi All,
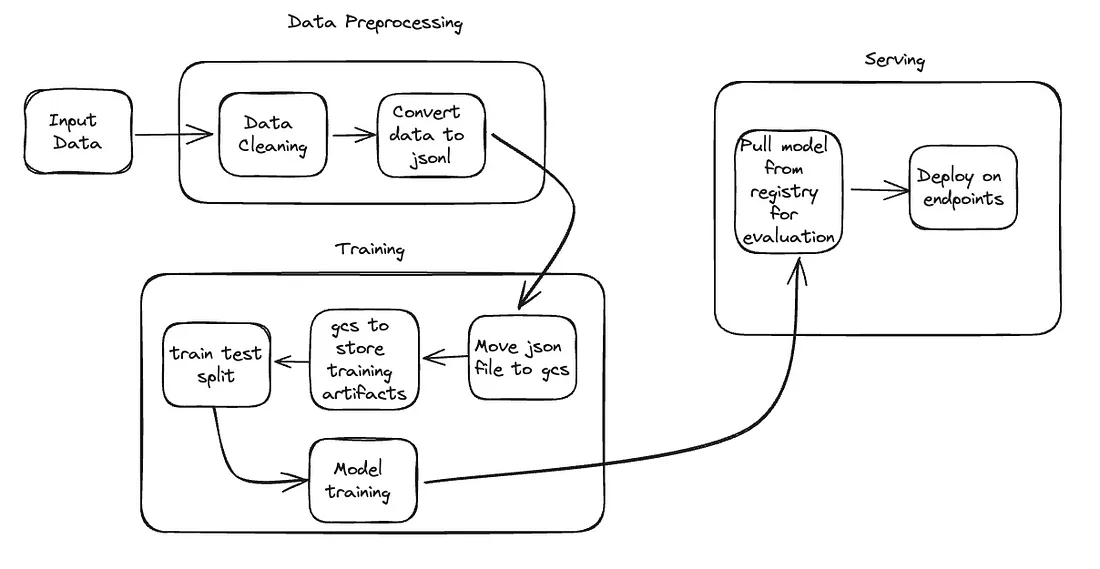
Unlocking the potential of AutoML on Vertex AI, a key component of the Google Cloud Platform (GCP) suite, opens doors to a myriad of machine learning applications. From regression to classification and entity extraction, AutoML simplifies complex tasks. This article focuses on custom entity extraction — a crucial aspect of natural language processing.
This article is part of an ongoing series on custom entity extraction. If you missed the previous articles, you can catch up by following this link for a comprehensive read.
Vertex AI is a comprehensive end-to-end machine learning solution within GCP, addressing every facet of machine learning. If you’re unfamiliar with this powerful service, you can delve into the details in my previous article.
As part of this exercise, we will be consuming:
- VertexAI Datasets
- Automl training
Assumption: You have already created a project and enabled VertexAI APIs in the project. If not, please enable it once prompted during the process or when you encounter an error related to that.
On VertexAI, we can use the workbench to launch jupterlab notebook and write our commands.
Step 1: setting up a project and defining variables
We will need these details for creating storage buckets, datasets, and Automl training jobs.
# Set up Project_ID and Region
PROJECT_ID = "[your-project-id]"  # @param {type:"string"}
REGION = "us-central1"  # @param {type: "string"}

# Set the project id
! gcloud config set project {PROJECT_ID}
Step 2: Creating storage bucket for intermediate artifacts
Set up a storage bucket to store input, output, and intermediate files generated during the training process.
BUCKET_URI = f"gs://your-bucket-name-{PROJECT_ID}-unique"  # @param {type:"string"}
! gsutil mb -l REGION -p PROJECT_ID $BUCKET_URI
Step 3: Import the Required Libraries
Import the necessary libraries and initialize the Vertex SDK.
import os
import google.cloud.aiplatform as aiplatform

#Initialize the Vertex SDK for Python for your project and corresponding bucket.
aiplatform.init(project=PROJECT_ID, staging_bucket=BUCKET_URI)

#loaction of training f
IMPORT_FILE = "gs://cloud-samples-data/language/ucaip_ten_dataset.jsonl"
Step 4: Training file location
This is the most important piece of this solution. Automl job accepts training data in JSONL format, so we must convert our data to JSONL file structure and store it in a GCS bucket for consumption.
IMPORT_FILE = "gs://cloud-samples-data/language/ucaip_ten_dataset.jsonl"
Step 5: Create a Dataset
Create a dataset for your custom entity extraction task using Vertex AI Datasets.
dataset = aiplatform.TextDataset.create(
    display_name="entity extraction example",
    gcs_source=[IMPORT_FILE],
    import_schema_uri=aiplatform.schema.dataset.ioformat.text.extraction,
)

print(dataset.resource_name)
Step 6: Create a training pipeline
To train an AutoML model, we have to first create a training pipeline.
job = aiplatform.AutoMLTextTrainingJob(
    display_name="entity_extraction_job", prediction_type="extraction"
)

print(job)
Step 7: Running the pipeline
We can start the training job by invoking the method run, with the following parameters:
dataset: Dataset resource to train the model.model_display_name: The human-readable name for the trained model.training_fraction_split: The percentage of the dataset to use for training.test_fraction_split: The percentage of the dataset to use for the test (holdout data).validation_fraction_split: The percentage of the dataset to use for validation.
The run method when completed returns the model resource.
model = job.run(
    dataset=dataset,
    model_display_name="entity_extraction_model",
    training_fraction_split=0.8,
    validation_fraction_split=0.1,
    test_fraction_split=0.1,
)
Step 8: Review model scores
After your model has finished training, we can review the evaluation scores for it. First, we need to get a reference to the new model. As with datasets, we can either use the reference to the model variable we created when we deployed the model or we can list all of the models in your project.
# Get model resource ID
models = aiplatform.Model.list(filter="display_name=entity_extraction_model")

# Get a reference to the Model Service client
client_options = {"api_endpoint": f"{REGION}-aiplatform.googleapis.com"}
model_service_client = aiplatform.gapic.ModelServiceClient(
    client_options=client_options
)

model_evaluations = model_service_client.list_model_evaluations(
    parent=models[0].resource_name
)
model_evaluation = list(model_evaluations)[0]
print(model_evaluation)
Step 9: Deploy the model to endpoints
Once model training is completed, GCP saves that model to the model registry for consumption. We can retrieve it and deploy it on the endpoint for online predictions.
endpoint = model.deploy()
Step 10: Make a prediction
It’s time to make the prediction. Endpoint expects input data in a certain format and we will have to make sure we are passing input in the same format.
instances_list = [{"content": "This is an example for an enity extraction"}]

prediction = endpoint.predict(instances_list)
print(prediction)
Congratulations! You’ve successfully implemented AutoML for custom entity extraction on the Google Cloud Platform. Stay tuned for more in-depth articles in collaboration with Vikrant Singh. You can also visit his medium articles.
Thank you!!
Leave a comment